Hotspots and their role in visual Syms
Hotspots are used to facilitate some form of user interaction with a visual Sym. There are many different types of hotspots, and different ways to manipulate them. Watch the visual Sym training video below to better understand hotspots, and why they're useful.
Creating Hotspots
After uploading the images and scripts for the Sym the next step is to add interactions to the images by creating hotspots.
This video explains the hotspot options available.
Button Hotspot Example:
This video explains how to add a button hotspot.
If you prefer text instructions, read on!
- Click Button to add this hotspot
.png?width=613&name=1661795228043-1661795228043%20(1).png)
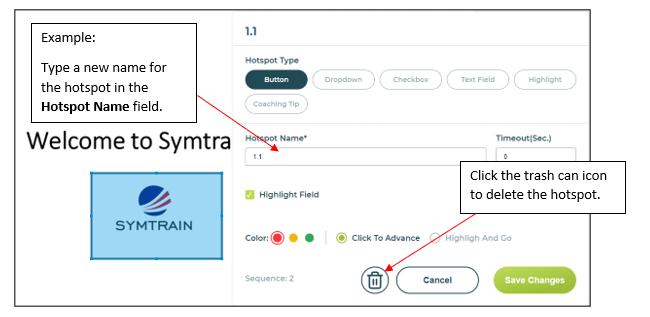
- Type a name for the hotspot in the Hotspot Name field. Decide on a naming convention (i.e., sequentially) to help with organization.
- Type an amount of time in the Timeout field. This is used for system navigation scoring. The Sym will automatically advance after the time duration if no action is taken by the trainee.
- Click the Highlight Field checkbox if you want the trainee to see the hotspot area. Leave the box unchecked if you do not want the trainee to see the hotspot area.
- If the Highlight Field box is checked, additional options display. See below.
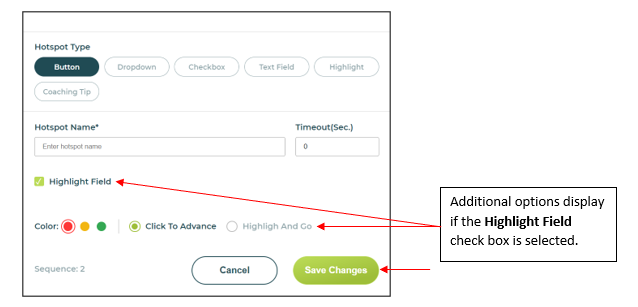
- Click Save Changes when done.
Text Field Hotspot Example:
This video explains how to add a button hotspot.
If you prefer text instructions, read on!
- Click Text Field to add this hotspot.
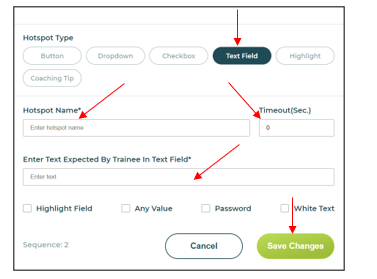
- Type a name for the hotspot in the Hotspot Name field. Decide on a naming convention (i.e., sequentially) to help with organization.
- Type an amount of time in the Timeout field. This is used for system navigation scoring. The Sym will automatically advance after the time duration if no action is taken by the trainee.
- Type the correct response in the Enter Text Expected By Trainee in Text Field.
- Click the Highlight Field checkbox if you want the trainee to see the hotspot area. Leave the box unchecked and the trainee will not see the hotspot area.
- (OPTIONAL) Click the check boxes if additional options are desired for Any Value, Password, or White Text.
- Click the Save Changes button when done
Highlight Hotspot Example:
This video explains how to add highlight and coaching tip hotspots.
If you prefer text instructions, read on!
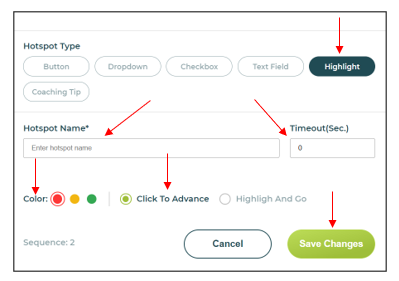
- Click Highlight to add this hotspot.
- Type a name for the hotspot in the Hotspot Name field. Decide on a naming convention (i.e., sequentially) to help with organization.
- Type an amount of time in the Timeout field. This is used for system navigation scoring. The Sym will automatically advance after the time duration if no action is taken by the trainee.
- Click the Color option preferred for this highlight.
- Select either Click To Advance, or Highlight and Go option.
- Click the Save Changes button when done
Coaching Tip Hotspot Example:
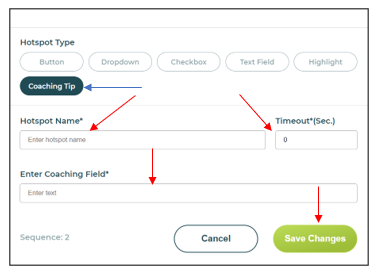
- Click Coaching Tip to add this hotspot.
- Type a name for the hotspot in the Hotspot Name field. Decide on a naming convention (i.e., sequentially) to help with organization.
- Type an amount of time in the Timeout field. This is used for system navigation scoring. The Sym will automatically advance after the time duration if no action is taken by the trainee.
- Type the text in the Enter Coaching Field field. This is the coaching text for the trainee.
- Click the Save Changes button when done.
Dropdown Hotspot Example:
This video explains how to add a dropdown hotspot.
If you prefer text instructions, read on!
- Draw hotspot in target location.
- Select Dropdown for hotspot type.
- Enter Hotspot name.
- Add possible dropdown values.
- Select the correct answer.
- Select highlight field (optional).
Checkbox Hotspot Example:
This video explains how to add a checkbox hotspot.
Edit or Delete a Hotspot:
To edit a hotspot:
- Go to the image with the hotspot.
- Click the hotspot. The hotspot dialog box displays.
- Make the needed edits.
- Click Save Changes.
NOTE: To delete the hotspot click the trash can icon. There is no confirmation message so be sure that you want to delete.
Hotspot Sequencing
You can specify when in the sym a hotspot appears.
- Click on Hotspot Sequence at the bottom right corner of the screen.
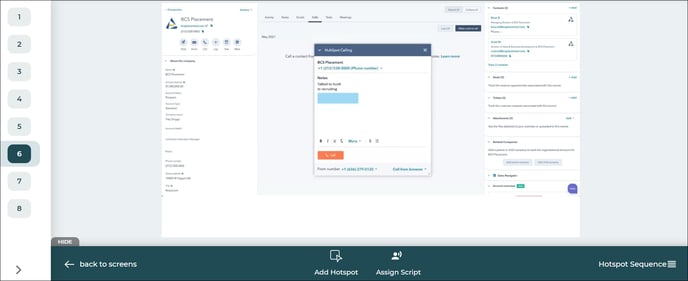
- A pop-up window will appear. By default, hotspots execute AFTER all script lines, so they show up at the bottom of the Hotspot Sequence list underneath the script lines. Scroll to the bottom to see them. (They are not visible in the image below).
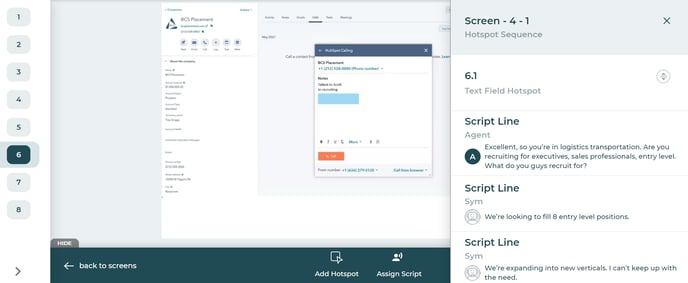
- To change the location of a hotspot, simply click the scrolling arrow icon next to the hotspot and drag it up or down to the desired location.
- Click the X in the upper right corner of the pop-up window to close the window and save your changes.
This video shows you how to edit hotspot sequences.
-
How to use Enable Multi-Hotspot feature
This handy feature lets you show trainees what to enter in a text entry field.
The “Enable Multi-hotspot” feature works great for showing a coaching tip box that contains text you need to enter in a text entry field hotspot.
On any screen where you want to use this feature, only assign script lines that MUST go with the text entry field hotspot, and do NOT have any other hotspots on that screen except the text entry field and the associated coaching tip. Duplicate screens as needed in order to achieve this goal.
-
SC15.7 Hotspots & sequence
Text field: allows input by the trainee